Schedule Planner is a tool for graduate and professional students. It helps you organize your classes by combining the courses you need, from SIS's Schedule of Classes, with your preferred breaks. It gives you multiple schedules to compare side-by-side and allows you to choose your optimal class schedule.
If you are an undergraduate student, see Degree Planning to learn about creating your schedule with Stellic.
Getting Started
From your Student Home in SIS, click the Classes & Enrollment tile, and you will find the link to Schedule Planner on the left.
First you will be prompted to choose the term you'd like to plan, then you may set various criteria such as "Course Status = Open Classes Only" and "Academic Career = Graduate".
Adding Classes
You can begin adding your desired courses by clicking the +Add Course button and choosing from the list. You can also add courses that already exist in your My Planner in SIS.
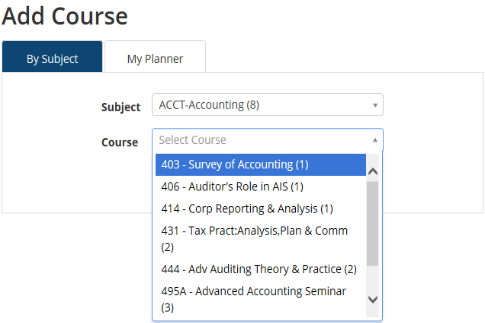
When you are finished selecting courses, click the Back button to generate your schedule options.

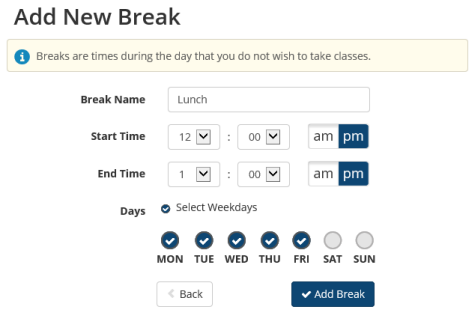
Adding Breaks
If there is a time during the day or week when you do not wish to take classes, you can add a break to your schedule by clicking the +Add Break button and setting your designated free time.
You can use the Class Padding option. It allows you to input the time you need between classes. Find it under Advanced Options.
Generating Schedules
Click the button Generate Schedules to see the list of possible schedules. To generate schedules without a particular course, you can uncheck the box to the left of the course and click Generate Schedules again. If a class has more than one section, you can choose Options and select the section you'd like to include. After you generate possible schedules, hover over the magnifying glass icon and preview the schedule in a calendar-like format.
Advisors will be able to see the schedules you have generated, add or remove courses in your Schedule Planner view, and email suggested schedules to you. Administrators such as Department Chairs and Department Assistants who have access to the Department Admin Center will have the same abilities as advisors.
Saving Favorites
Save your favorite schedules by clicking the heart icon at the top right of the screen when viewing a schedule. From the home page, click the Favorites Tab to view, edit and compare favorite schedules.
Filtering
You can filter classes by instructor or section attribute. On the Course Options screen, click the Advanced Filters button and add (or remove) filters to sections of a course.
Registering for Classes
While viewing your chosen schedule, click the Send to Shopping Cart button at the top of the page. This will send your course selections to SIS. In SIS, visit your shopping cart to continue. From there, you will continue with the normal registration steps to enroll in your classes through SIS. If you want to return to SIS without sending any courses to your cart, simply close the window or tab in which Schedule Planner is open to return to SIS.
If you need to register for classes in two different careers, Schedule Planner can be used to help you create schedules for each career, but currently, it cannot send the courses back to your shopping cart.
Additional Help
Schedule Planner has several instructional videos available. Choose Help from the top menu to view them.