Concept
Lifesize© is an Internet protocol (IP) videoconferencing solution that enables users to collaborate in real-time using high-definition video technology. LifeSize can easily connect with other Lifesize units and additional forms of IP technology, including the Scopia© desktop client and Cisco TANDBERG® sites. To communicate with a site using Cisco TelePresence®, the UTech department must set up a connection bridge in advance of the call. Fill out the Videoconference Meeting Request Form to request assistance with scheduling a videoconference.
Preparing for a Videoconference
- Ensure that the LifeSize videoconferencing system is plugged into both the electrical outlet and the wired network.
- Use the LifeSize remote control to turn the system ON.
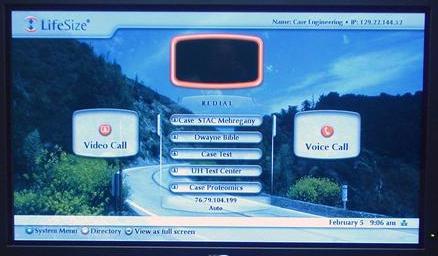
- The home screen appears with the following options:
a. System Information: Shows the system name and IP contact number at the top of the screen.
b. Primary Video Input: Displays camera output in the small window below the system information.
c. Video Call: Used to initiate a new videoconference.
d. Voice Call: This option should not be used for voice-only calls. Long distance calling charges apply.
e. System Status Bar: Allows you to access the system menu and directory. Indicates the date and time, system and network status, the number of voice and video calls completed and the duration of the call in progress.
Navigating the Main Screen
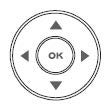
Use the arrow keys on the remote control to navigate the main screen. As you move around the screen, the icons and descriptions appearing in the navigation bar change to indicate what actions are available for a selected object or screen.
Controlling the Camera

Press the near camera button and use the following buttons on the remote control to adjust the camera:
The Left and Right arrow keys pan the camera side to side. The Up and Down arrow keys tilt the camera vertically.
The Zoom in and Zoom out keys allow you to focus on objects at varying degrees of magnification.
After adjusting the camera settings, press the orange button on the remote control to exit the menu.
Adjusting the Volume
Set the system volume on the control box so that only two of the green lights are illuminated. If you need to adjust the volume while on a call, use the speaker volume button on the remote control or the LifeSize phone.
Note: The speakers will turn ON automatically when a call is placed.
Starting a Videoconference
To place a videoconference call you need the IP address, Integrated Services Digital Network (ISDN) number or bridge number for the location you wish to contact. This information should be exchanged during the conference scheduling process. Before you begin, always adjust the camera and check the system volume.
Placing a Video Call from the Main Screen
- Use the arrow keys on the remote control to select Video Call.
- Press the OK button on the remote control.
- Enter the destination IP number using the keypad on the remote control.
- Press the Call button on the remote control to dial the number.
- To end a call, press the OK button twice.
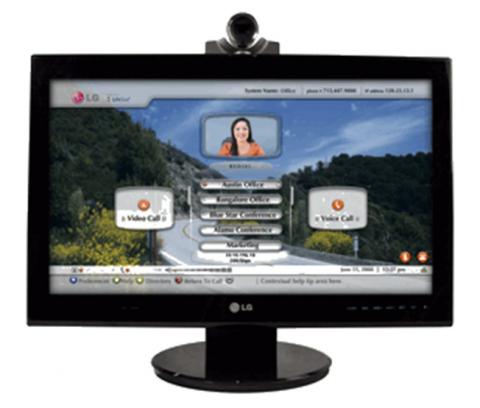
Placing a Call from the LifeSize Phone
If a LifeSize telephone is connected to your LifeSize videoconferencing system, you can manually dial a video or voice call using the telephone keypad.
- Press the Video key. Note: Using the Voice option will result in long distance charges being applied to your account.
- Use the numeric keypad to enter your IP address, IDSN number or bridge number.
- To end a call from the LifeSize phone, press the Video button.
Placing a Call from the Redial List
- Use the arrow keys on the remote control to scroll down the list of previously dialed calls and select the desired number.
- Press the OK button to dial out.
- To end a call, press the OK button twice.
Placing a Call from the Directory
The directory of calls is not automatically populated with IP address or ISDN numbers and must be created by each videoconferencing system owner. If you frequently dial the same numbers, you can ask your system administrator to add those numbers to the directory for future use.
- From the main screen, press the orange button on the remote control to access the directory.
- Use the arrow keys on the remote control to select from the available directories:Local, Corporate or Meetings.
- Press the OK button on the remote control.
- Use the arrow keys to select the entry that you wish to dial.
- Press the OK button to place the call.
- To end a call, press the OK button twice.
Receiving a LifeSize Call
Colleagues using a LifeSize, Polycom™, Scopia or TANDBERG videoconferencing system can call into your system after you provide them with contact information.
Note: On most systems, incoming calls are accepted automatically, but callers will be unable to hear unless your speaker volume is turned ON. Some systems may require you to press the Enter or Call button to accept an incoming call.
Changing Video Inputs
LifeSize videoconferencing systems can display two video streams:
- Primary input: Video stream from the LifeSize camera
- Presentation input: Video stream from a laptop computer connected to the system
Press the green button on the remote control to switch between the primary and presentation inputs.
Note: Video quality reproduction from a laptop computer may not be ideal. Small text and fine detail may not transmit well to the other end of the videoconferencing call.
Sharing Laptop Content with Local Participants Only
- Turn the LifeSize display ON.
- Connect the video cable from the LifeSize system to the laptop VGA video output connector.
- Turn the laptop ON.
Sharing Laptop Content with All Videoconference Participants
- Turn the LifeSize display ON.
- Connect the video cable from the LifeSize system to the laptop VGA video output connector.
- Turn the laptop ON.
- Press the green button on the remote control to switch between the primary and presentation inputs.
- To display the computer screen to your conference room, press the Call button on the remote. The Call button allows you to choose from three states:
- Far video large / Near video small
- Near video large / Far video small
- Near video and Far video at equal size
Note: The Near video setting refers to your video feed. The Far video setting refers to the video feed from the other end of your conference call.