Creating or modifying a Group
A separate page (https://its-services.case.edu/googlegroups) has been set up for the creation and deletion of Google Groups at Case Western Reserve. See Create a Group for more information.
There are three default roles created for every Google Group: Owner, Manager and Member. These roles cannot be removed.
The Owner role: For Google Groups at CWRU, the Owner role is exclusive to university's Google administrators. End users can not be made owners.
The Manager role: For users to manage the group.
Managers can:
- Create or delete the group
- Add or remove users from the group
- Promote or demote members to/from manager role
- Change the settings of the group to tailor the needs
In other words, they have (almost) complete control over the group.
The Member role: The default role for all of the users in a group. They are the ones that will receive email sent to the group.
- Go to groups.case.edu.
- Click My Groups.
- Select the Group you want to work with
- Click on Group settings on the left of the workspace.
For more information on modifying Group settings, visit the Groups Training and Help page.
Adding members to a Group
When a new Group is created, the user who requested the Group is automatically added to that Group as a Manager.
Newly created Groups limit membership to those who have a valid case.edu email address. To allow external members:
- Go to groups.case.edu.
- Click My Groups
- Select the Group you want to manage
- From the menu to the left of the page, click Group settings
- Locate "Allow external members"
- Set it to ON
- Click Save changes
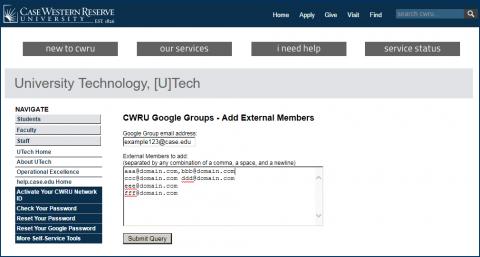
University Technology, has a tool that allows you to add email addresses in bulk: https://its-services.case.edu/googlegroups/external.html
NOTE: You must be the manager of the group to which you are adding members
- Create your Google Group
- Access the Add External Members web page and enter the email address of your Google Group
- Enter the list of external email addresses to be added to the Google Group separated by any combination of a comma, a space, or a newline
- Click the Submit Query button
Managing members of a Group
Google does not provide a way for Group managers to prevent members from unsubscribing. Contact the UTech Service Desk for additional information and possible alternatives.
A current manager for the affected group must open the appropriate Manage Group page by going to groups.case.edu, clicking the "My group" link, and selecting the group for which a manager is being added.
If the person being given a manager role is already a member of the Group:
- Select "Members" from the menu to the left of the screen to view a list of all current members of the group.
- Locate the name of the person being given the manager role and check the box next to their name.
- Click the "Change Role" button at the top of the screen and select Manager" from the dropdown list.
- Verify that "Manager" now appears in the Role column next to the new manager's name.
If the person being given a manger role is NOT a member of the Group:
- Follow the instructions on "How to direct add members" (located on the Training Resources for Google Groups page under "Add People to Your Group") to add the person as a group member.
- When finished, follow the instructions above to assign the Manager role to the new member.
WARNING: DO NOT ATTEMPT TO REMOVE YOURSELF AS A GROUP MANAGER UNLESS THERE IS ANOTHER ACTIVE MANAGER IN THE GROUP. You will not be able to re-add yourself as a manager!!!
Open the appropriate Manage Group page by going to groups.case.edu, clicking the "My groups" link, and the group from which you want to be removed.
If you want to remove the manager role but remain a member of the Group:
- Select "Members" from the menu to the left of the screen to view a list of all current members of the group.
- Locate your name on the list and check the box next to your name.
- Click the "Change Role" button at the top of the screen and select "Member" from the dropdown list.
- Verify that "Member" now appears in the Role column next to your name.
If you want to remove yourself completely from the Group:
- Follow steps 1 & 2 from the instructions above to locate and select your name from the list of members.
- Click the "Remove member" button
A pop-up box will ask if you are sure you want to be removed from the group. Click "Remove" to continue or "Cancel" to remain in the group.


