General Security Best Practices
Cases of "Zoombombing" have started to hit Case Western Reserve University meetings, including classes. Zoombombing is when a malicious individual finds an open Zoom meeting link and enters the meeting to disrupt it verbally or by sharing inappropriate material. Below are simple actions you can take to protect your meetings.
Top recommendations for securing your meetings against Zoombombing
- Don’t publish your Zoom meeting ID or URL publicly. If you need to share the details for a public event please contact the [U]Tech Help Desk for more information on taking additional measures to secure your meeting.
- Hosts can require participants to authenticate themselves before joining, either using their CWRU network ID and passphrase for internal, university meetings or using another Zoom account (professional or personal) for attendees from outside the university
- Set a waiting room for your meetings
- Use the in-meeting security settings to limit who can share their screen, unmute themselves, or turn on video
See the sections below for details on how to use these settings in your meetings and for other recommendations on how to use Zoom safely and securely.
- Check for Zoom application updates often, at least once a week. Click on the profile icon in the upper right of the application and select "Check for Updates".
- Don't post Zoom links on a public website or in social media. If you need to share the details for a public event please contact the [U]Tech Help Desk for more information on taking additional measures to secure your meeting.
- Don't use your personal meeting ID for meetings
- Schedule your meetings at the Zoom web portal to get the full set of security options for your meeting
Log into the Zoom web portal to set these options.
- Consider selecting "Only authenticated users can join meetings".
- If all of the participants are within the university, select "Signing into CWRU SSO Required". When prompted to log in, users should click the "Sign in with SSO" button
- If there are participants from outside of the university, select "Sign in to Zoom". This required every attendee to have a Zoom account. Notify the participants so they can sign up for a free Zoom account prior to the start of the meeting, if needed.
- If you don't want participants to join/interact before the host enters, uncheck "Allow participants to join anytime"
- Set an alternate host if you need a backup host.
- Consider turning on the "waiting room" for your meeting so that you can scan who wants to join before letting everyone in.
Sign into the Zoom web portal, click on Settings from the left side menu and consider the following account-wide options:
- To protect your meetings, screen sharing has been set to "host only" for everyone.
- You can grant participants the ability to share their screen during the meeting by clicking the up arrow next to the "Share Screen" button.
- Uncheck "Allow Removed Participants to Rejoin" so that participants who you have removed from your session cannot re-enter
- Turn on "Only authenticated users can join meetings from Web client", so if a participant wants to join your meeting from a web browser, they must first log into their Zoom account (either from CWRU or another Zoom account) before joining. This does not prevent an unauthenticated user from joining the meeting from a Zoom app or software, only from the web interface.
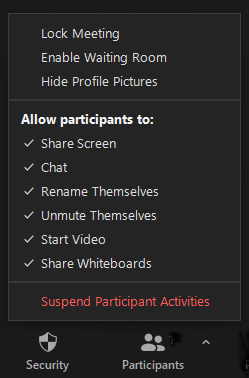
When you are hosting a meeting, use the “Security” button to quickly and easily:
- Lock your meeting to the current set of participants
- Enable a waiting room for anyone who has not joined yet
- Allow or block participants from sharing their screens, chatting, renaming themselves, unmuting, starting their video, or sharing a whiteboard
- Suspend participant activities will stop all video, audio, in-meeting chat, annotation, screen sharing, and recording during that time will stop, and Breakout Rooms will end
- You can access the security settings for sharing an individual Zoom cloud recording by:
- Sign into Zoom web portal
- Select “Recordings” from left side menu
- Click the recording URL
- Click the “Share” button
- By default, the recording will be set to require CWRU SSO
- You can change to “Publicly” (only set if you are okay with anyone seeing the video) or “Password protect”
- If you set a password, be sure to distribute it to your audience via email, Canvas, etc.
- You can set the Zoom recording defaults for your account by:
- Sign into Zoom web portal
- Select “Recordings” from left side menu
- Click the “Recording” tab
- Adjust default security settings for your recordings, including:
- Require SSO
- Require a password
- If you need to share the video with a specific group of CWRU users, you can:
- Sign into Zoom web portal
- Select “Recordings” from left side menu
- Click the recording URL
- Click the “Download” button
- Upload the video file (.mp4) to Google Drive or Box and then share with your audience. Google Drive and Box have built-in video players.
- If you record locally in Zoom, you can share your recording by:
- Upload the local recording to Google Drive or Box and then share with your audience. Google Drive and Box have built-in video players.
- For information about Zoom recordings visit our Zoom Recording Guide
Below are guidelines provide by Zoom:
- Securing Your Zoom Meetings
- Blog: Top Ways Zoom Hosts & Admins Can Ensure a Secure Meeting Experience
- Online Course: Zoom Security Basics (must sign into your Zoom account to access)